
Gif making guide
Have you ever wanted to create your own GIF to personalize your bot cards, but don’t know where to start? There are plenty of platforms and tools out there that make it easy to go from idea to animation, no need to be a pro to get started.
Let’s start with the BASICS - what exactly is a GIF?
GIF is the friendly abbreviation for Graphics Interchange Format, or, in simpler terms, a fun way to say a loop of images compressed together.
Unlike videos, GIFs can be shared across many platforms and are generally much easier to post, and why is that, you ask? Well simply because GIFs are compressed, making them much easier to load and send.
How to make a GIF?
As mentioned earlier, there are plenty of platforms you can use to create your own GIFs, here’s a quick summary of some of them:
| Application | Advantages | Disadvantages |
|---|---|---|
| GIPHY | Very easy to use, large library, social media integration | Limited editing options, sometimes average quality |
| Canva | Intuitive interface, lots of templates, full editing features | Limited free version |
| Photoshop | Full control over each frame, professional quality | Complex to use, paid, time-consuming to create |
| Imgur Video to GIF | Fast video to GIF conversion, free | Limited features, depends on original video quality |
| GIF Maker - ImgPlay | Convenient mobile app, easy editing | Lacks advanced features, ads in free version |
| Adobe Express | Modern interface, good export quality, Adobe integration | Some paid features, requires an Adobe account |
I personally recommend using Canva, it offers a lot of creative freedom, even with the free version, and it’s extremely easy to use.
This tutorial will focus specifically on that platform, but feel free to explore and try out the others if you prefer. There’s no one right way, anything is possible!
First Set Your Goal
It's important to know why you're creating your GIF, because the approach will vary depending on your goal. For example, animating your character or avatar will require a different method than animating a line of dialogue or a mood reaction.
So here’s a list of examples for GIF that are relevant when it comes to bot making.
Keep in mind: your GIFs will appear on your bot's card or on your character's profile picture when users open the card.
In the bot card:
➛ Animate a Dialogue Line
Make a line of text appear on screen, as if it's being typed or received like a message. Perfect for simulating a real-time chat or giving a preview of how your OC talks.
➛ Pixel Art Character
You can create a moving chibi version of your character (either by drawing it yourself if you're an artist, or/and edited in photoshop or generated with tools like MidJourney, NijiJourney..etc)
On the bot PP:
➛ Animate Your Character / Avatar
If your bot is based on an original character design, you can go further and animate the character Avatar itself (changing backgrounds, adding visual effects, and more)
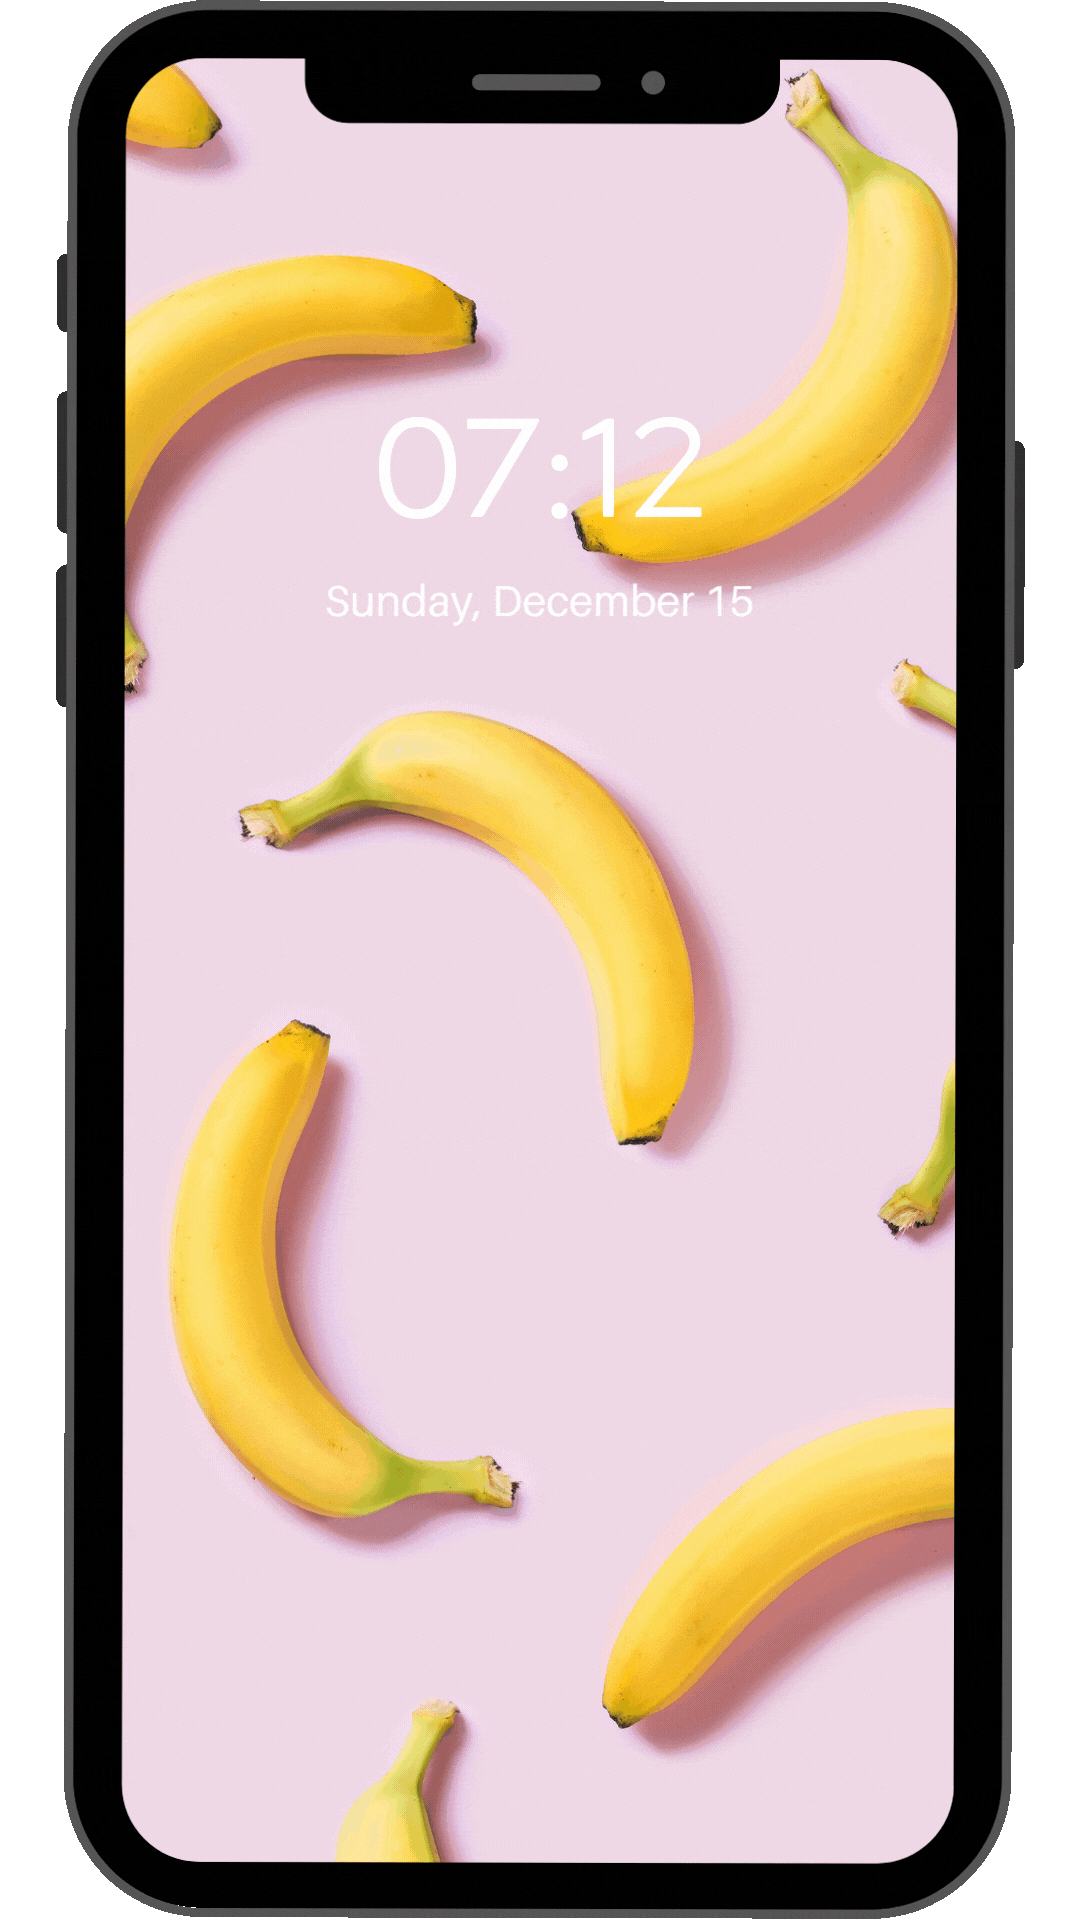
Animate a Dialogue Line GIF | Step by Step on Canva
Here's the example of a simple GIF you can create: (https://files.catbox.moe/vfkxig.gif)
Step 1 - Choose the Right Template
On Canva, you'll find tons of templates similar to the one I used in the GIF. Just search for "phone" in the template library and pick one that fits your style.
Mine (https://files.catbox.moe/vfkxig.gif) uses a premium vip template, but you can easily recreate the same effect with a free version
- Pick the phone template you like
- Replace the wallpaper to match your character's vibe. If the template doesn't let you change it directly, just add a new image on top and resize it to fit the phone screen. (Since phone shapes are rectangular, it should be easy to adjust)
- Customize the date, time, etc. Most templates already include this, but if not, just add text manually
Step 2 - Create Your Message Bubbles
- On a new blank page, create a semi-transparent rectangle
- Add a circular image frame for your character's profile picture
- Below that, write the text of the message
- Group everything together
💡 Add the time next to the message (e.g. "now" or a specific hour) to make it feel realistic. If you're unsure how real messages look, search for examples online and replicate the thing)
Step 3 - Build the Sequence
Back on your main phone screen page, duplicate it as many times as you have messages.
Then place your messages step-by-step:
- Page 1: Add only the first message
- Page 2: Add the first + second message
- Page 3: Add the first + second + third, and so on
How it should look:

💡 Adjust the timestamps slightly for each new message, it adds a nice touch of realism.
Step 4 - Animate Your Scene
Time to bring it all to life
- Keep the phone background completely static, no animation needed there
- Select your grouped message bubble
- Click "Animate" in the top toolbar
- I used "Rise" with a medium speed, set to appear on entry
- For each new page, ungroup the older messages and remove their animations! Only the new message should move!
💡 Make sure that only your SMS moving elements are grouped
Step 5 - DL Your GIF
- Click "Share" in the top right
- Select "Download"
- Choose "GIF" file type
- Download and lessgo

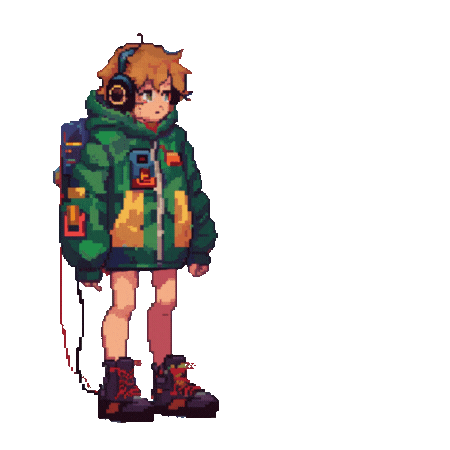
Animate Your Pixel Art Character | Step by Step on Canva
Here's an example of a simple animated GIF you can create for your pixel art character: https://files.catbox.moe/wzhio6.gif
Note: Canva's animation tools are definitely not the best, you can get much better results using other platforms or software dedicated to animation!!
Step 1 - Prepare your Pixel Avatar
Before starting the animation you'll need:
- Your character's pixel avatar with a transparent background (drawn by you if you're an artist, edited in photoshop or generated with tools like MidJourney, NijiJourney..etc)
- Optional: Any other elements like stars, flames, sparkles, floating stuffs, magical effects etc.
Step 2 - Separate your body parts
To create movement you'll need to murder and split your character into parts (stay in peace pookie):
- First, duplicate your character avatar, click "Background Remover" and click again to activate the manual erasing, then isolate the head (A drawing tablet makes this so much easier, but well, it's also doable with a mouse; just takes a lot more patience and some good emotional support)
- Duplicate the full image again and this time cut out the torso
- Do it one last time to isolate the legs
- Now travel to Las Vegas with a shovel, some tape and.. Oops wrong tuto, my bad
- Once all parts are separate, head to a new page in Canva and reassemble your character using the separated layers
Example with mine :

💡 Tip: You can go further and cut out the hands, hair and more elements (the more you cut out and animate along with the rest, the more "alive" your result will look)
Step 3 - Animate Your Pixel Avatar
Now it's time to bring your character to life:
- First, click on the head layer, choose "Create an Animation" this time instead of using Canva's default effects (they're too clunky for pixel art)
- Manually create a simple "idle" motion, like a small bounce and set the speed to your liking
- Repeat the same for the torso and legs, and make sure everything stays aligned and doesn't drift apart when animated
💡 Test and adjust as you go
Step 4 - Animate other elements (Optional)
If you've added sparkles, symbols or any other effects you can animate them too:
- Same as before, just add a motion (e.g: fade, float, rise, etc)
- Keep it light and clean too many moving elements can overwhelm the visual
💡 Less is more!
Step 5 - Set the Timing and DL Your GIF
Once your animation looks good:
- Select your page, and set the duration of the loop e.g. 2-3 seconds.
- Use the Play button to preview how it flows
- Click "Share" in the top right corner.
- Choose "Download", then select the GIF format.
- Make sure to check "Transparent Background"
- Download your final animation!
And you're done!
Animate Your PP Character | Step by Step on Canva
Here's an example of a simple animated GIF you can create for your character using Canva: https://files.catbox.moe/jqolei.gif
Step 1 - Get Your Avatar Ready
You'll need:
- Your character's without any background (drawn by you if you're an artist, edited in photoshop or generated with tools like MidJourney, NijiJourney.etc)
- A matching background (can be detailed or minimal depending on ur preference)
- Optional : Any decorative elements you want to add, like stars, flames, symbols, sparkles, floating effects etc..
Step 2 - Build Your Composition
- Open Canva and import your background
- Add your Character, resize and position them
- Optional: On Canva, you've got access to tons of vectors, icons, illustrations, effects etc. Don't hesitate to decorate with visual effects, stars, smoke, runes, or anything else
💡 Use Canva's layers panel to stay organized if you're using many elements
Step 3 - Animate Your Scene
Animate the Background
- Select your background.
- Click "Animate" in the top toolbar
- Browse the effects and choose one (e.g: Zoom, Pan, Drift)
- Try them and pick the one you like best, on mine (https://files.catbox.moe/jqolei.gif) I used "Zoom" and lowered the intensity a bit
Animate Your Character
- Click on your character and choose an animation. Try using a slightly different one from the background (ex: Zoom In vs Zoom Out)
- Adjust the speed and direction if needed for contrast/balance.
Animate Decorative Elements
- Add movement to stars, sparkles, floating icons of whatever you’ve added in your compo if you want them to react
- Use different effects (ex: Pop, Drift, Fade) to create depth
- Keep it balanced too many effects can clutter the animation
💡 Again, less is more. Focus on subtle, clean motion that enhances your character!
Step 4 - Add More Scenes (Optional)
Want a more dynamic GIF with multiple scenes? Here's how:
- Repeat the process of your first page
- Swap out elements: change your character's image if you can, with a new pose/expression. Change the background, or add new visual effects.
- Animate the new elements just like you did before.
- Click the "+" button between pages to add a transition (like Fade, Slide, etc.)
💡 You can create mood shifts, location changes, or even mini story moments!
Step 5 - Adjust Timing
- Select each scene/page and set how long it stays on screen (e.g: 2-3 seconds)
- Fine-tune animations to be slower or faster for dramatic or subtle effects
💡 Preview regularly with the Play button to check the flow of your sequence.
Step 6 - DL Your GIF
- Click "Share" in the top right.
- Select "Download".
- Choose GIF format.
- Pick your preferred size (medium is great for online use)
- Download your animated masterpiece!
Bonus Tips
- Match the color palette of your background and effects to your Character's vibe.
- Keep experimenting, you can save different versions to compare later.